Knowledge Base |
Consolidated Refunds
|
This article will guide you through processing a refund for transactions tied to a single payment method.
Requirements - A Master Admin login or a staff type that has the following permissions:
1. Access POS Terminal

To access this screen you will need to click on Main > POS. If you are not already logged into a POS you will need to access one. On a simple terminal click the GO button or on a Full POS click the Open button to start the Open POS process. For steps on opening a Full POS, click here.
2. Select Invoices

If you have the setting enabled, invoices that are due today, or past due, will automatically pull into the cart. To add future invoices to the cart, click on the Future Invoices option. A list of future invoices will appear, you can now click Add next to each invoice you wish to add to the cart. Once you have the desired invoices added to the cart, Close on the future invoice menu and proceed to Checkout.
To learn more on how to purchase products in the POS, click here.
3. Complete Checkout
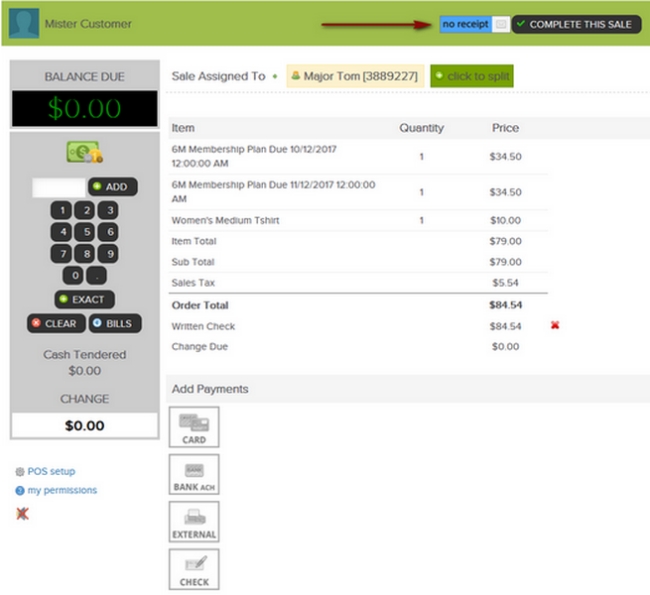
Clicking the CHECKOUT button will advance you to the payment screen. Select what employee should get credit for the sale. Select the payment method for the purchase. For cash sales you may choose the pad provided. After selecting your payment method the option to COMPLETE THIS SALE will appear. Change the receipt method if desired and then click the button COMPLETE THIS SALE to finish the purchase process.
1. Locating Invoices

Locate the customer by searching for them under the Prospects or Customers/Members tab. Click on the customer's name Select the BILLING icon. You can also go to All Detail > Billing > Invoices/Payments/Refunds/Transaction Ledger. Click on the Invoices tab to view all invoices paid by the selected customer.
2. Select Payment Details

Select the Payments tab to locate the payment details including the date, time and payment method. Select the blue payment ID number to proceed with the refund.

From here, the screen will display what form of payment was used to pay the initial invoice and invoices tied to the transaction. Click the Issue A Refund button.
3. Issue A Refund

Select the Refund Method from the drop down, the options are as follows:
Refund to clients CC/Bank ACH on file depending on payment method.
Refund to Written Check. This is an option in which the club cuts a check to the client.
Refund to Cash. This is an option in which the club refunds the client cash.
Refund to Client Credit Balance. This option never leaves ClubReady and never goes back to the clients payment method on file. It is stored within the clients profile, for use on future purchases within ClubReady.
Send Notification Email - you may choose yes or no, this is toggle as shown above. Default is set to yes. Option to send a Partial Refund - Default is set No, you may break up your refund into a partial amount here.
Return Item To Stock - This option is available if refunding a product and wish to add the item back to your inventory.
Optional Note field - leave a note if you wish.
Refund - Click on the button to complete the refund process.
Requirements - A Master Admin login or a staff type that has the following permissions:
- Member Management : Payments Related - Can view client billing information
Complete A Transaction With Multiple Invoices
1. Access POS Terminal
To access this screen you will need to click on Main > POS. If you are not already logged into a POS you will need to access one. On a simple terminal click the GO button or on a Full POS click the Open button to start the Open POS process. For steps on opening a Full POS, click here.
2. Select Invoices
If you have the setting enabled, invoices that are due today, or past due, will automatically pull into the cart. To add future invoices to the cart, click on the Future Invoices option. A list of future invoices will appear, you can now click Add next to each invoice you wish to add to the cart. Once you have the desired invoices added to the cart, Close on the future invoice menu and proceed to Checkout.
To learn more on how to purchase products in the POS, click here.
3. Complete Checkout
Clicking the CHECKOUT button will advance you to the payment screen. Select what employee should get credit for the sale. Select the payment method for the purchase. For cash sales you may choose the pad provided. After selecting your payment method the option to COMPLETE THIS SALE will appear. Change the receipt method if desired and then click the button COMPLETE THIS SALE to finish the purchase process.
Issuing A Refund
1. Locating Invoices
Locate the customer by searching for them under the Prospects or Customers/Members tab. Click on the customer's name Select the BILLING icon. You can also go to All Detail > Billing > Invoices/Payments/Refunds/Transaction Ledger. Click on the Invoices tab to view all invoices paid by the selected customer.
2. Select Payment Details
Select the Payments tab to locate the payment details including the date, time and payment method. Select the blue payment ID number to proceed with the refund.
From here, the screen will display what form of payment was used to pay the initial invoice and invoices tied to the transaction. Click the Issue A Refund button.
3. Issue A Refund
Select the Refund Method from the drop down, the options are as follows:
Refund to clients CC/Bank ACH on file depending on payment method.
Refund to Written Check. This is an option in which the club cuts a check to the client.
Refund to Cash. This is an option in which the club refunds the client cash.
Refund to Client Credit Balance. This option never leaves ClubReady and never goes back to the clients payment method on file. It is stored within the clients profile, for use on future purchases within ClubReady.
Send Notification Email - you may choose yes or no, this is toggle as shown above. Default is set to yes. Option to send a Partial Refund - Default is set No, you may break up your refund into a partial amount here.
Return Item To Stock - This option is available if refunding a product and wish to add the item back to your inventory.
Optional Note field - leave a note if you wish.
Refund - Click on the button to complete the refund process.