Knowledge Base |
Check In Web Kiosk Settings
|
This article will guide you through setting your Check-In Web Kiosk.
Requirements - A Master Admin login or a staff type with the following permissions:
1. Kiosk Setup
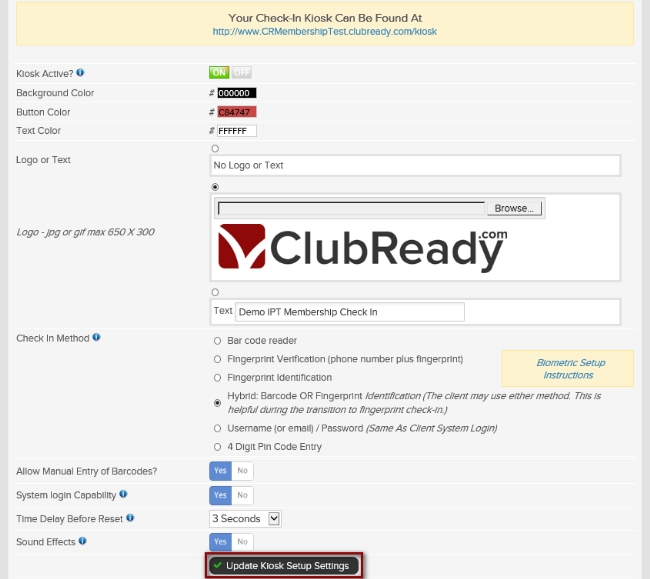
To apply your default check in web kiosk settings, go to; Setup > General > Check In Web Kiosk > Kiosk Setup.
Kiosk Active - the check in kiosk will be inactive until this is on.
Background Color - you can set the background color for the check in web page screen
Button Color - you can set the button color for the check in web page screen
Text Color - you can set the text color for the check in web page screen
Logo or Text - you can set your check in web page to use no text, custom text, or select a logo to display
Check In Method - Here you can select from the options for check in.
System Login Capability - the check in kiosk can display a "System Login" button. This opens up the clubs login page and can be used for client or providers to login
Time Delay Before Reset - after successful check in, the screen must return back to the check in authentication screen ready for the next user. This determines what the time delay is before that reset occurs
Sound Effects - the check in kiosk can play a sound for a successful access and for a failed access
Click Update Kiosk Setup Settings to save your changes.
2. Functionality

Welcome Customer - After customer has been identified by the check in system, you have the option to welcome the customer from the check in screen. If selected, the following options will display:
Click Update Kiosk Functionality Settings to save your changes.
3. Message/Ads

To display messages and/or an image on the welcome page after a successful check in, select which customer type you want to receive the message. The customer types are classified as: Everybody, Only Those Who have Not Purchased Services and Those Who Have Already Purchase Services. To add a message, select On to type the content. To add an image, select On, which will prompt you to select a file saved on your PC. Click Update Kiosk Message / Ad Settings to save your changes.
Requirements - A Master Admin login or a staff type with the following permissions:
- Setup: Can access setup
- Setup: Can access check in web kiosk setup
Access The Check In Web Kiosk Setup
1. Kiosk Setup
To apply your default check in web kiosk settings, go to; Setup > General > Check In Web Kiosk > Kiosk Setup.
Kiosk Active - the check in kiosk will be inactive until this is on.
Background Color - you can set the background color for the check in web page screen
Button Color - you can set the button color for the check in web page screen
Text Color - you can set the text color for the check in web page screen
Logo or Text - you can set your check in web page to use no text, custom text, or select a logo to display
Check In Method - Here you can select from the options for check in.
- Bar Code
- Fingerprint Verification (phone number plus fingerprint)
- Fingerprint Identification
- Hybrid
- Username (or email)/ Password
- 4 Digit Pin Code Entry
System Login Capability - the check in kiosk can display a "System Login" button. This opens up the clubs login page and can be used for client or providers to login
Time Delay Before Reset - after successful check in, the screen must return back to the check in authentication screen ready for the next user. This determines what the time delay is before that reset occurs
Sound Effects - the check in kiosk can play a sound for a successful access and for a failed access
Click Update Kiosk Setup Settings to save your changes.
2. Functionality
Welcome Customer - After customer has been identified by the check in system, you have the option to welcome the customer from the check in screen. If selected, the following options will display:
- Show Photo - this will display their photo ID
- Show First Name - this will display the customer's first name
- Show Last Name - this will display the customer's last name
- Show Visit Count - if selected it will tell the customer how many visits they have had to the club
- Recognize Birthdays - if selected it will recognize customers birthdays when they check in by giving them a Happy Birthday greeting on the check in screen
- Block Prospects - select if you want to block prospects from check in to the location
- Redirect Text - enter the text used to redirect them
- Time Constraints - select when the customer can check in for their scheduled booking: Any Booking Same day or Set A Time Range. This will prompt to choose how many hours before and after the booking.
- Allow Session Log Offs of Past Due Members - if selected, this logs the users session before the problem redirect message
- How To Confirm Bookings - if selected then the customer will be asked to confirm any bookings that are shown.
Click Update Kiosk Functionality Settings to save your changes.
3. Message/Ads
To display messages and/or an image on the welcome page after a successful check in, select which customer type you want to receive the message. The customer types are classified as: Everybody, Only Those Who have Not Purchased Services and Those Who Have Already Purchase Services. To add a message, select On to type the content. To add an image, select On, which will prompt you to select a file saved on your PC. Click Update Kiosk Message / Ad Settings to save your changes.