Knowledge Base |
How To Send An Email Blast
|
Requirements - A Master Admin login or staff type with the following permissions:
- Member Management: Communication - Can email bulk members
- Member Management: Communication - Can change the default from email address for email blasts to members
- Member Management: Communication - Can change the default from email address for email blasts from the past due manager
- Member Management: Communication - Can use alternative email templates for past due manager email blasts
- Member Management: Communication - Can send emails to opt outs
- Member Management: Communication - Can use alternative email templates for customer email blasts
Sending An Email Blast
1. Selecting The Desired Clients And Then Starting The Blast
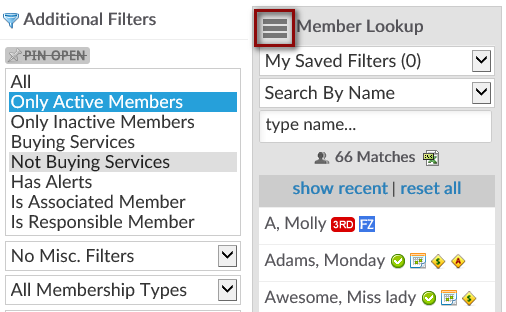
To start narrowing down who will receive the email blast, click on the Prospect or Customer / Members tab. To narrow the list of clients further, click on the FILTERS button. This is the 3 lines next to Lookup. This will provide you with options to narrow the search. Select any of the desired filters from the list of drop-downs. Keep in mind that your email blast will attempt to send to all of the names that are showing in the lookup list at the time you send your blast, so filtering will allow you to email a target audience.
2. Creating And Sending The E-mail Blast

Now that you have successfully narrowed down the list of clients click on the Email tab to continue. The gray portion of this page allows you to set the template, subject and reply information for your blast.
Reply To - This will list the default reply to email address based on your club settings. This is the email address that replies will be sent to if your member chooses to respond to your blast. Staff with permissions may use the pencil to adjust this email.
CC - Replies can also be sent to an additional staff person. This setting can be found in the System Emails setup for Default Member Email Blasts under Setup.
Subject - This will allow you to enter the subject line for your email. NOTE: Do not copy and paste the subject line in with any special characters.
Email Template - This is the template that is assigned. You have the options to view the template or to change to an alternate email template. Please note that changing the email template, requires a permission as listed in the requirements above.
Purpose - This allows you to tie a purpose to the email blast.
REQUIRED: For your custom email template to be available for an email blast, it must contain the following:
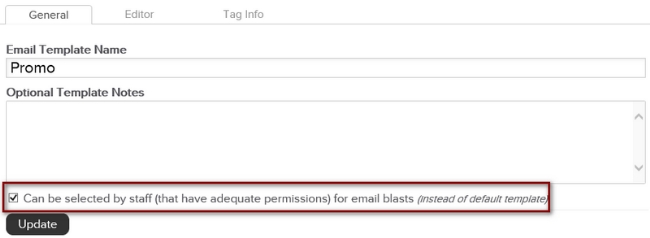
1. The email template setting should be eligible for staff to select for email blasts. You are able to locate setting under Setup > Communications > Email Templates > edit pencil next to your custom template.
2. [unsubscribe] tag
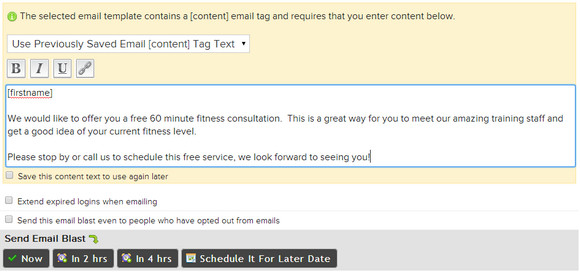
If the e-mail template includes the [content] tag you will have a text box appear with the basic editor features of bold, italics, underline and the option to add a web link. This will allow you to type a message to your clients. If you wish to paste text into this field we recommend you paste the content into notepad first then copy and paste from note pad into this field. This should eliminate characters that are only supported in a word processing program. If you have saved any email content previously you can select this saved text from the drop-down box that says Use Previously Saved Email.
Save this content text to use again later - If you are going to send this out on a regular basis you can save it by checking this box.Extend expired logins when emailing - If you want to extend the client's access to their login select this box.
Send this email blast even to people who have opted out from emails - this will include any clients that have opted out of receiving e-mail. This option is typically used for notifying
clients of past due or collections status issues. This option should only be used if the blast you are sending in non-promotional.
After you have finished creating the content for your email blast, there are four options for send time:
Now - will queue the blast to be sent within a few minutes of making this selection.
In 2 hrs or In 4 hrs - will delay the blast by a 2 - 4 hours.
Schedule It For Later Date - allows you to create your email blast in advance and schedule it up to 14 days out by selecting a specific date from a calendar. When you select this option your blast would be queued to be sent the morning of the date selected.
The status of the email blast as well as an option to stop the blast can be viewed in the Live Send Queue.
Frequently Asked Questions:
- Why is my custom email template not showing as an option when trying to sent?
1. Check Email Template Setup to confirm it can been selected by staff for email blasts.
2. The email template must have the [unsubscribe] tag.
Yes. You can add yourself as a "test prospect" and add your email address. When viewing the Email Blast screen, make sure to filter to just view the "test prospect" you have created. Once filtered, it will only send to that account.